Monday, January 20, 2014

Flashback crafts - Wizard of Oz party

This week I have unfortunately no new crafts to show - not that I haven't been crafting but just that nothing is in a state to really show here.  

I finished the children's bed crowns but The Husband wasn't able to put it up this weekend. Furthermore I'm busy finishing of a crochet blanket that I started last year already and I'm happy to report I'm only 10 blocks from finished and I also started making some Spring place mats which turned out to be a bit more work than anticipated......

So I decided to post some pictures of my youngest' birthday party December. I was all set to throw her a mermaid party until we watched The Wizard of Oz and she promptly informed me that she wants a Wizard of Oz party - this a month beforehand so I quickly had to scramble to think up new ideas.  

I'm very happy with how everything turned out and she really enjoyed it - she even still plays with the little dolls I made as decoration for the party.


Wednesday, January 15, 2014

Cupcakes, snowstorms and other little things that makes me happy!

I have two vices in life - chocolate and cupcakes! I try to stay away from all these sins as much as possible, I honestly do, but every now and again (with other words every 2 weeks or so) I start to crave cupcakes. 

It isn't a sudden thing, it will build up over a few days. At first I will staunchly think of something else as soon as I start day-dreaming about lovely cupcakes, but it will get worse as the days succeed one another and by day 3 I will normally decide that in order for me not to completely go bonkers I will have to bake cupcakes and when this craving goes with an approaching snow storm (which I love - I LOVE snow!!!!) what is a girl to do but bake cupcakes?

So yesterday, after I had to pick up the kids early from school due to early closure because of said approaching snow storm I decided the kids and I needed some cupcakes (in other words, I NEEDED CUPCAKES!)


At first I wanted to make my go-to recipe that I got from my sister ages ago (which is divine by the way!), but then I decided that life is too short and there are too many recipes out there and I decided to make this vanilla cupcake recipe - http://www.browneyedbaker.com/2010/10/28/vanilla-cupcakes-vanilla-buttercream-frosting/. And oh my, am I ever happy that I did? Lovely moist, extra vanilla-ey and rich cupcakes. I think I'm in love - in fact I love these so much I might even choose them over chocolate cupcakes - I think!  So now I'll be able to go about 2 weeks again without cupcakes - problem solved!

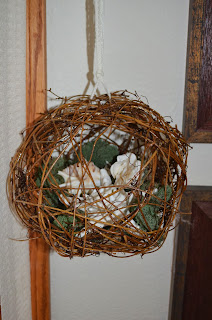
What else did I do this weekend? I made this kissing ball that I saw a picture of on Pinterest and I think it came out quite nicely.


And I also made this dream catcher that I saw here - http://www.usefuldiy.com/diy-simple-dreamcatcher/ except mine doesn't look as nice as theirs. I like the beads that I worked around the hoop but I think I need to add more ribbons and lace at the bottom. I'm still pondering what to add....
And the other thing I would like to add is another colour wall to hang it on because this cream colour of our rental home is soooooo drab but that is something that a renter has to live with and something that will have to wait until we move back to Germany. Until then my poor dream catcher will have to keep on hanging against a background wall that does absolutely nothing for it, but as they say.... C'est la vie!


Tuesday, January 7, 2014

The lampshade in crafting purgatory

Last year I got it into to my mind to re-decorate the living room. Part of that re-decorating dreams involved a tall standing lamp. But knowing that we will most probably return to Europe in the foresee-able future I decided that I didn't want to spend too much money on buying an electrical appliance that will probably not be used because of the schlep of converting the US voltage to European voltage.

A few weeks after I started the re-decorating process (which is still a work in progress....) I discovered American thrift-stores and with that came the hope that I would be able to find a poor, neglected wooden lamp stand that just needed my loving care to restore it to its former beauty. All fired-up I started to think of ways to create a lamp-shade for my stand (that I still had to find) and what would be more fitting for my shabby chic deco than a cozy cream crocheted lamp-shade? 

I bought a cheap lamp-shade as well as some super chunky cream-coloured wool that had an almost chenille-like feel to it.  I made enough chains to fit around the bottom part of the lamp shade. Then I started crocheting some sc's, decreasing a few stitches every row, just to keep it fitting snugly around the lamp shade.  When I had finished this I crocheted a shell border around the bottom and there she was - exactly as I had imagined it, except without a lamp stand!!!!


The poor lamp shade has been sitting in crafting purgatory for the past few months - eagerly awaiting that day when I will finally take it out of the finished crafts' cupboard and put it on top of its stand, but alas! Apparently people do not throw away tall standing lamps, neither do they throw out sturdy, solid wood coffee tables (but that is another sad story....!)

It would appear that the poor lamp shade will have to wait until we get back to Europe where I will buy it a proper lamp stand!


The main bedroom of the gnome villa

I've been making some progress with the refurbishment of the gnome villa.  This weekend I've been working on some furniture for the main bedroom.

First I made a fancy fairy bed with canopy using inspiration from this post - Use Twigs to Make a Rustic Miniature Bed in Several Model Scales. 

Basically I took some twigs, my trusty glue gun and some twine and first hot-glued the twigs together in a sort of bed shape and then I just strengthened everything with the twine. I made a little mattress by needle-felting some wool fleece and then as a final touch I decided that even fairies like to read in bed at night so I added a reading lamp!


For the reading lamp I just hot-glued a bead I had into an acorn cap!

Now I started to think about creating a cozy little corner in the main bedroom where the fairies could sit and relax after a long day painting butterfly wings and all such activities that fairies get up to.....

Then I thought about these extraordinary hanging bubble chairs that I have seen around...... examples of these here.
I mean, aren't these just the height of glam? And since we're upgrading the gnome villa to glamorous status I started to think of ways to recreate these chairs for the villa.

In the end I came up with the idea of crocheting some half spheres and suspend them from the roof using eye-let hooks and ribbon.  I used some waxed string that I had lying around because I liked the colour and I thought they would make the chairs hold their shape better.


 Next up I want to sew little pillows for the chairs and also make the coffee table and a nice rug to add to the coziness! 


Thursday, January 2, 2014

Easy-peasy breakfast muesli

I love playing at being the scientist in my kitchen. Being able to reproduce the same things you buy in the store and the end-product being cheaper and tastier than the store-bought version gives me an immense thrill.  But I'll be honest, many of the things I try out, I will try out once, just to be able to say it can be done and then will never do it again because it is just too much schlep to do it again and there are so many other things I still want to try out.

But every now and again I find something that sticks - something that is just soooo easy and so much cheaper and sooooooooo much tastier and healthier than the store-bought version that it becomes part of our family's daily habits. 

One such thing is my bread-machine muesli.

It was about a year and a half ago that I made my first batch of homemade muesli. The first time I made it in the oven, and true it tasted WAY better than the store-bought version but the time in the oven it required made it way more expensive than the store-bought version. So I thought that this would also end up as one of those once-off experiments.

That is until I read one day that muesli can be made in your bread machine using the jam setting! SAY WHAT???????

Of course I had to try this out and how happy I was that I had done so because the result was an easy, the-machine-does-everything, yummy muesli that even the hubby agrees is way better than the store-bought version.

Since that day I have tweaked my ingredients and from time-to-time I will add something different but the basic recipe stays the same.

I pop the ingredients into the machine just after dinner, whilst cleaning the kitchen and by the time we put the children to bed we'll have our next batch of yummy muesli for the next morning. One batch will last the family two to three mornings.

I normally add some dried cranberries or raisins to ours and the children prefer theirs with a few chocolate chips thrown in. These add-ons you can change as you like but any fruit or chocolate should only be added in after the bread machine has finished.  Another staple of our muesli recipe is a cup of nuts - I normally use walnuts but I've also added pumpkin seeds, sunflower seeds and pecan nuts at different times.


Recipe
Easy-peasy bread-machine muesli

½ cup oil (I normally use Canola Oil as that is what I have in the house)
½ cup maple syrup or honey
3½ cups oats flakes (traditional not instant)
½ cup wheatgerm (optional)
2 tbsp flaxseed meal (optional)
1 cup nuts of your choice (optional)
1 tsp vanilla essence
1 cup dried fruit (eg. cranberries or raisins) or ½ cup of chocolate chips (optional and only to be added when taking the muesli out of the machine)

Important note:  Add the ingredients in the exact order as listed!

Add all the ingredients to the bread-machine and set to jam setting.
When the program is finished, remove muesli from machine and add fruit or chocolate if using.